

How It Works
TestDriver automatically manages AWS EC2 instances for your tests:- Deploy CloudFormation — One-time infrastructure setup
- Configure Vitest — Add one line to your config
- Run Tests — Instances spawn automatically, run tests, and terminate
Quickstart
1
Deploy Infrastructure
Launch CloudFormation Stack
One-click AWS setup
2
Add to Vitest Config
vitest.config.mjs
3
Run Tests
Overview
The setup process is simple:- Deploy CloudFormation — Creates VPC, security groups, IAM roles, and launch templates
- Configure Vitest — Add
setup-awsto automatically manage instance lifecycle - Run Tests — Set
TD_OS=windowswith AWS credentials and instances spawn/terminate automatically
Prerequisites
Before you begin, ensure you have:- AWS account with CloudFormation permissions
- AWS CLI installed and configured (
aws configure) - Access to the TestDriver AMI — Contact us with your AWS region
- A GitHub repository for your tests
Step 1: Deploy CloudFormation Stack
Our CloudFormation template creates all the AWS infrastructure you need:- Dedicated VPC with public subnet
- Security group with required port access
- IAM roles and instance profiles
- EC2 launch template for instance creation
- GUI
- CLI
Click the button below to launch the CloudFormation stack in your AWS Console:Configure the stack parameters: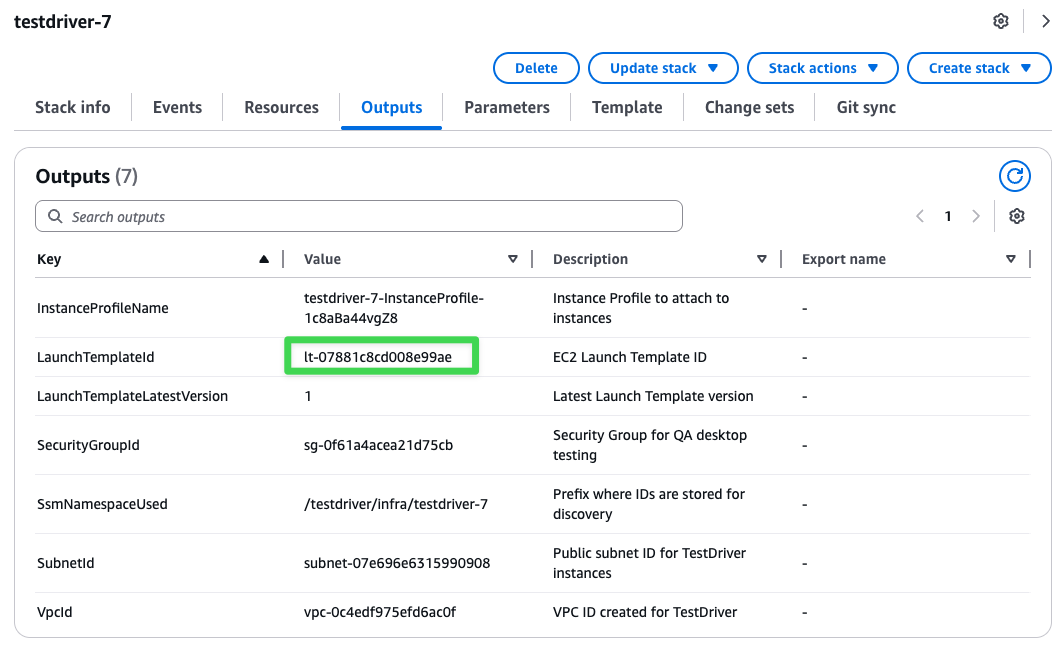
Launch Stack
Deploy TestDriver infrastructure with one click
- Stack name:
testdriver-infrastructure(or your preferred name) - ProjectTag:
testdriver - AllowedIngressCidr: Your IP range (e.g.,
203.0.113.0/24) - InstanceType:
c5.xlarge(recommended) - CreateKeyPair:
true
Get Your Launch Template ID
After the stack creation completes, navigate to the Outputs tab to find yourLaunchTemplateId:Step 2: Configure Vitest
Add the AWS setup hook to yourvitest.config.mjs:
vitest.config.mjs
That’s it! The
setup-aws hook automatically spawns and terminates instances when TD_OS=windows is set. No manual instance management needed.Step 3: Write Your Tests
Tests should usecontext.ip || process.env.TD_IP for the IP configuration:
How it works: When
TD_OS=windows with AWS credentials, context.ip is automatically set by the setup hook. When running without AWS setup (cloud-hosted), both are undefined and TestDriver uses the cloud. When TD_IP is provided manually, it takes precedence.Step 4: Run Tests
Locally
Each test gets its own fresh EC2 instance that’s automatically terminated after completion.
In GitHub Actions
Automate testing with self-hosted instances in your CI/CD pipeline. TestDriver automatically spawns a fresh instance for each test, runs the test, and terminates the instance..github/workflows/test.yml
Automatic Instance Management: Setting
TD_OS=windows with AWS credentials enables automatic instance spawning. Each test gets its own fresh instance that’s terminated after the test completes.Required GitHub Secrets
Example Workflows
For complete production examples, see:- Scheduled Tests — Daily automated test runs
- Reusable Workflow — Shared configuration for PR and scheduled tests
Advanced Usage
Using an Existing Instance
If you already have a running instance, you can skip automatic spawning by providingTD_IP:
setup-aws hook will detect TD_IP is already set and skip spawning a new instance.
Manual Instance Management
For advanced use cases, you can manually spawn instances using thespawn-runner.sh script:
- Scheduled Tests — Daily automated test runs
- Reusable Workflow — Shared configuration for PR and scheduled tests
Connecting to an Instance
You can connect to running instances via:- RDP — Use the public IP on port 3389
- VNC — Access via web browser at
http://<public-ip>:5900 - AWS Console — Use EC2 Instance Connect or Session Manager
Stopped instances retain their EBS volumes and can be restarted later. Terminated instances are permanently deleted. Always terminate instances when done to avoid storage costs.
AMI Customization
The TestDriver Golden Image comes pre-configured with:- Windows Server with desktop environment
- VNC + web server for remote access
- Python, Node.js, Git
- TestDriver agent and dependencies
Creating a Custom AMI
You can customize the AMI to include additional software or configurations:1
Connect via RDP
Use the default credentials:
- Username:
testdriver - Password:
wwv9uJ0sqlulbN3
2
Change the Password
Critical: Run the password rotation script immediately:Save the new password securely.
3
Install Your Software
Install any additional dependencies, configure settings, or modify the environment as needed.
4
Create New AMI
Use the AWS console or CLI to create an AMI from your modified instance. Update your workflow to use the new AMI ID.
Security Best Practices
Network Security
- Restrict CIDR blocks — Only allow access from known IP ranges
- Use VPC endpoints — For private AWS service communication
- Enable VPC Flow Logs — For network monitoring
AWS Authentication
Use OIDC instead of long-term credentials for GitHub Actions:Instance Security
- Terminate immediately after tests complete
- Monitor costs with AWS billing alerts
- Use least-privilege IAM roles
- Enable CloudTrail for audit logging
Troubleshooting
Instance Not Responding
- Check security groups — Verify required ports are open (RDP 3389, VNC 5900, TestDriver ports)
- Verify status checks — Ensure instance has passed AWS status checks
- Check AMI compatibility — Some instance types don’t support certain AMIs
Connection Timeouts
- Verify network connectivity from CI runner to instance
- Check VPC routing and internet gateway configuration
- Confirm instance is in the correct subnet
AWS CLI Errors
- Validate credentials and permissions
- Check service quotas and limits
- Verify region consistency across all resources